ようやくlameがコンパイルできたので、環境構築手順を纏めてみる。
まず、MinGW-w64環境を構築する。
MinGW-w64のバイナリをhttp://sourceforge.net/projects/mingw-w64/から持ってくる。
私は、現時点の最新版である、mingw-w64-bin_i686-mingw_20090811.zipをダウンロードした。
ダウンロードが終わったら、アーカイブ(zip)を解凍する。
解凍先は、C:\MinGWなど、自分が分かりやすいパスを指定する。
私の場合は、D:\MinGWに解凍した。
解凍後、binフォルダに入っている
x86_64-w64-mingw32-addr2line.exe、x86_64-w64-mingw32-ar.exe......
というファイルを、全て
addr2line.exe、ar.exe......
となるようにリネームする。
一つずつリネームするのが面倒なら、以下の内容のバッチファイルをbinフォルダに作成し、実行すると楽かもしれない。
@echo on
rename x86_64-w64-mingw32-addr2line.exe addr2line.exe
rename x86_64-w64-mingw32-ar.exe ar.exe
rename x86_64-w64-mingw32-as.exe as.exe
rename x86_64-w64-mingw32-c++.exe c++.exe
rename x86_64-w64-mingw32-c++filt.exe c++filt.exe
rename x86_64-w64-mingw32-cpp.exe cpp.exe
rename x86_64-w64-mingw32-dlltool.exe dlltool.exe
rename x86_64-w64-mingw32-dllwrap.exe dllwrap.exe
rename x86_64-w64-mingw32-g++.exe g++.exe
rename x86_64-w64-mingw32-gcc-4.5.0.exe gcc-4.5.0.exe
rename x86_64-w64-mingw32-gcc.exe gcc.exe
rename x86_64-w64-mingw32-gccbug gccbug
rename x86_64-w64-mingw32-gcj.exe gcj.exe
rename x86_64-w64-mingw32-gcov.exe gcov.exe
rename x86_64-w64-mingw32-gfortran.exe gfortran.exe
rename x86_64-w64-mingw32-gprof.exe gprof.exe
rename x86_64-w64-mingw32-jcf-dump.exe jcf-dump.exe
rename x86_64-w64-mingw32-ld.exe ld.exe
rename x86_64-w64-mingw32-nm.exe nm.exe
rename x86_64-w64-mingw32-objcopy.exe objcopy.exe
rename x86_64-w64-mingw32-objdump.exe objdump.exe
rename x86_64-w64-mingw32-ranlib.exe ranlib.exe
rename x86_64-w64-mingw32-readelf.exe readelf.exe
rename x86_64-w64-mingw32-size.exe size.exe
rename x86_64-w64-mingw32-strings.exe strings.exe
rename x86_64-w64-mingw32-strip.exe strip.exe
rename x86_64-w64-mingw32-windmc.exe windmc.exe
rename x86_64-w64-mingw32-windres.exe windres.exe
pause
(最初からgcc.exeのようなファイル名になっている、/mingwフォルダや/x86_64-w64-mingw32フォルダに入っているものを使用しようとすると、コンパイル時に
hatsune@HATSUNE-SERVER ~
$ gcc -v time.c
Using built-in specs.
Target: x86_64-w64-mingw32
Configured with: ../../../build/gcc/gcc/configure --target=x86_64-w64-mingw32 --
prefix=/c/buildbot/vista64-mingw32/mingw-x86-x86_64/build/build/root --with-sysr
oot=/c/buildbot/vista64-mingw32/mingw-x86-x86_64/build/build/root --enable-langu
ages=all,obj-c++ --enable-fully-dynamic-string --disable-multilib
Thread model: win32
gcc version 4.5.0 20090806 (experimental) (GCC)
COLLECT_GCC_OPTIONS='-v' '-mtune=generic'
cc1 -quiet -v -iprefix d:\mingw\mingw\bin\../lib/gcc/x86_64-w64-mingw32/4.5.0/
time.c -quiet -dumpbase time.c -mtune=generic -auxbase time -version -o S:\UserT
emp\hatsune\ccd8FXk1.s
gcc.exe: CreateProcess: No such file or directory
とエラーが発生してしまい、コンパイルできない問題にハマってしまった)
次に、MinGWを使用する上で必要なMSYS環境を構築する。
MSYSバイナリをhttp://sourceforge.net/projects/mingw/から持ってくる。
現時点の最新版である、MSYS-1.0.11.exeをダウンロードした。
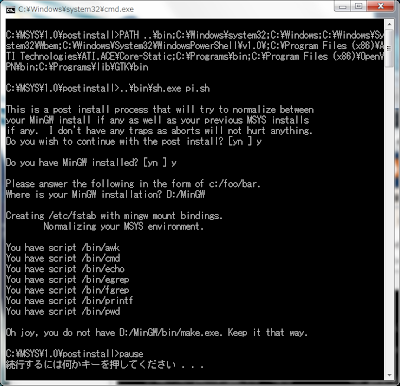
ダウンロード後、インストーラーを実行し、MSYSのインストールパスを指定、インストールすると、コマンドプロンプトが開き、
This is a post install process that will try to normalize between your MinGW install if any as well as your previous MSYS installs if any. I don't have any traps as aborts will not hurt anything.
Do you wish to continue with the post install? [yn ]
と出るので"y"を入力。
すると、
Do you have MinGW installed? [yn ]
と出るので、これも"y"を入力。
次に、
Please answer the following in the form of c:/foo/bar.
Where is your MinGW installation?
と出るので、MinGWをインストールしたパスを指定する。
私の場合は、D:/MinGWを指定した。
ここでパスを指定する際に、パスの区切りを"\(円記号・バックスラッシュ)"ではなく"/(スラッシュ)"にする必要があるので注意する。

後は、てきとうなCのソースコードを持ってきて、MSYS上でコンパイルして実行する。
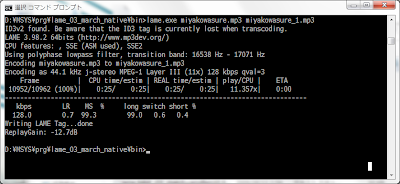
lameなら、いつも通り
$ ./configure
$ make
$ make install
とするだけで、コンパイルできる。
タスクマネージャーでそのプロセスを見て、"*32"がプロセス名に付いていなかったら、x64のバイナリが作成・実行出来ているということになる。

手順並べるとこんなに簡単なのに、何故あんなに苦労したんだ…('A`)

0 件のコメント:
コメントを投稿